Smart Google Drive Cleanup: Archive First, Delete Second
Most people clean up Google Drive by deleting things they might need later. Here's the workflow that protects you from that mistake—and keeps your Drive fast, organized, and actually under control.
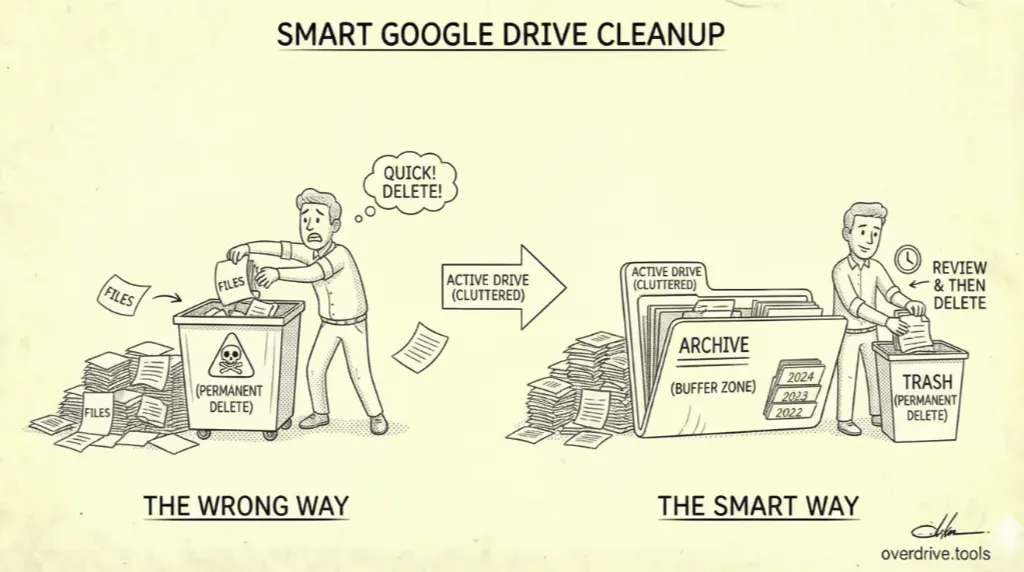
Most Google Drive cleanups follow the same pattern: you hit your storage limit, feel the pressure, and start deleting things quickly. A week later you're looking for a file that's gone. A month later you've forgotten what you deleted at all.
The problem isn't that you cleaned up—it's the order of operations. Deleting is permanent. Archiving is reversible. Doing one before the other is the difference between a Drive that's organized and a Drive that's just smaller.
Google doesn't give you an archive function. There's no button that says "I'm done with this but not ready to delete it." That gap is intentional—Google's business model benefits when you run out of space and upgrade. But you can build the workflow yourself, and once it's in place it takes maybe ten minutes a month to maintain.
Why Archiving Before Deleting Actually Matters
The instinct during a cleanup is to treat every file as either "keep" or "delete." But most files in a cluttered Drive belong to a third category: done, but not necessarily disposable. Finished project files. Old versions of documents. Recordings of meetings that ended six months ago. Tax folders from three years back.
These files have two things in common: you're unlikely to open them again, and you can't be fully certain you'll never need to. Deleting them outright trades a small, definite benefit (freed storage) for an unknown risk (losing something you needed). Archiving gives you the benefit of a cleaner active Drive without the risk.
There's also a practical speed argument. Files in an archive folder don't show up in recent file views, don't clutter search results, and don't appear in the "suggested" section at the top of Drive. Moving something to an archive is itself a form of cleanup—it removes files from your daily workflow without removing them from existence.
The goal of an archive isn't to keep everything forever. It's to create a buffer between active files and permanent deletion—a place where things go to be reviewed one more time before they're gone for good.
Step 1: Create a Simple Archive Structure
Before you can archive anything, you need somewhere to put it. The structure doesn't need to be complicated. A single top-level folder called Archive with year-based subfolders is enough for most people.
📁 Archive
   📁 2024
   📁 2023
   📁 2022
For work-heavy Drives, you might add a category layer:
📁 Archive
   📁 2024
      📁 Client Work
      📁 Internal Projects
      📁 Admin
   📁 2023
      📁 Client Work
      ...
A few rules that make the archive more useful:
Keep it at the top level of My Drive. Burying the archive inside another folder adds friction to moving things there. If it's easy to access, you'll actually use it.
Use years, not projects. Project-based archive folders sound logical but fall apart quickly—you end up with dozens of folders and no consistent principle for what belongs where. Year-based folders are dumb and fast: if something is from 2023, it goes in 2023.
Don't reorganize when you archive. The most common mistake is trying to perfectly categorize files as you move them to the archive. That's how a ten-minute cleanup turns into an afternoon. Move the files; sort later (or never).
Step 2: Identify What Should Move to the Archive
The candidates for archiving are files that are complete but not yet clearly deletable. A few practical ways to surface them:
Filter by last modified date. In Google Drive, click the filter icon in the search bar and use the Modified filter to show files not touched in over a year. Anything untouched for 12+ months is a strong candidate for the archive—if you haven't needed it in a year, you're unlikely to need it in your active Drive. You can also use Drive's search operators directly: before:2025-01-01 owner:me will show all files you own that haven't been modified since the start of 2025.
Look at completed project folders. If you have a folder for a project that's been finished for months, the entire folder can usually move to the archive as a unit. Don't pick through individual files—move the folder, and the decision is made.
Check your "Shared with me" view. Files shared with you by others don't count against your storage quota, so they're not a storage problem. But they do clutter your Drive and search results. Removing them from view (by right-clicking and selecting Remove from Drive—this removes it from your view, not from the owner's Drive) clears the noise without affecting anyone else.
Look for finished file types. Meeting recordings, project exports, old presentation versions, annual reports, archived correspondence—these are rarely needed again but often feel too significant to delete immediately. They're ideal archive material.
What shouldn't go in the archive: files you access regularly, templates you use actively, anything that's part of a live project. The archive is for files where the work is genuinely done.
Step 3: Move Files—Don't Copy Them
This sounds obvious but it's where people make mistakes. Copying a file to an archive folder and leaving the original where it was doubles your storage usage and defeats the purpose. Move files to the archive; don't duplicate them.
On desktop: Select the file or folder, right-click, choose Move to, and navigate to the appropriate archive folder. You can also drag files directly into the Archive folder in the left sidebar if it's starred or pinned for quick access.
For bulk moves: Select multiple files using Shift-click or Command/Ctrl-click, then right-click any selected file and choose Move to. All selected files will move together. This is the fastest way to clear out a completed project folder's worth of files.
One thing to check before moving: If a file is owned by someone else—visible in the "Owner" column in list view—moving it to your archive folder doesn't change who owns it or where it counts against storage. Only files you own count against your quota. Archiving files owned by others tidies your view but doesn't reclaim space.
Step 4: Set a Review Window, Then Delete
An archive without a review process just becomes a second cluttered Drive. The archive's value is in giving you a buffer—but that buffer needs an expiration.
The simplest system: once a year, open your archive folder for the previous year and delete everything you haven't touched. If you archived something in early 2024 and it's now early 2026 and you still haven't needed it, you almost certainly never will. Delete the folder.
For files you're genuinely uncertain about, download them to a local or external drive before deleting from Google Drive. Once they're off the cloud, they no longer consume your quota—but you still have them if you ever need them. This is the last safety net before permanent deletion.
When you delete from the archive, empty the trash. Items deleted from any folder in Drive—including the archive—sit in Trash for 30 days and continue counting against your storage quota until you empty it. Go to Trash in the left sidebar and click Empty trash after any batch of deletions.
The Maintenance Habit: Ten Minutes a Month
The archive workflow fails if it becomes another thing you only do in a crisis. The goal is making it a light, regular habit that prevents crises from developing.
Once a month—or at the end of any significant project—do three things:
- Move completed project folders to the archive
- Skim the active Drive for anything that's been sitting untouched for months and doesn't belong there
- Check whether last year's archive folder is ready to be deleted or downloaded
That's it. Each pass takes a few minutes when the Drive is reasonably current. The quarterly crisis cleanup takes hours precisely because it's never done in small doses.
Overdrive can help identify which files and folders haven't been accessed in months—surfacing archive candidates automatically rather than requiring you to manually sort through dates. That makes the monthly pass significantly faster when a Drive has accumulated years of files.
What This Workflow Actually Solves
The archive-first approach solves three distinct problems at once.
The accidental deletion problem. When you archive before you delete, every file gets a review period. You have to actively decide to delete something twice—once when you archive it, and once when you clear the archive. That friction prevents the regret of deleting something you needed.
The cluttered active Drive problem. Even if you're nowhere near your storage limit, a Drive full of old files is slow to search, confusing to navigate, and full of noise in the "Suggested" and "Recent" views. Archiving clears this without deleting anything.
The storage pressure problem. When you do need to free space, you're not making panicked decisions about individual files. You're making a single decision—"is it time to clear the 2023 archive?"—with the knowledge that those files have been sitting untouched for over a year.
Google built Drive to store everything indefinitely and make finding old files easy. That's a reasonable philosophy, but it produces Drives that become impossible to navigate. The archive workflow gives you the control that Drive doesn't.
Related Articles
- Google Drive Folder Structure: Best Practices for 2026
- The Ultimate Google Drive Storage Cleanup Guide (2026)
- How to Find and Delete Duplicate Files in Google Drive